
Now more than ever, having a professional web presence is crucial for small businesses to adapt to and overcome changes in the donor space.
It is easy to have a great-looking website. If, however, you aren’t collecting data about your site visitors, all the creative effort can be for naught. An ugly website with proper analytics is more valuable than a pretty site for which no data is collected.
The reason why is because when you have clean website data, you can make informed decisions on where to focus your efforts. For example, if you have a landing page that isn’t performing, you can dig into the page behavior and pick out things to test.
If you have no data, you would be making landing page changes in the dark.
Or what happens if you suddenly get a flood of traffic? You definitely want to know where it came from!
In this article, I’ll be showing you how to professionally set up your website’s digital tracking, including how to set up Google Analytics, so that you have meaningful site data.
The good news is that this is a one-time install. Even if you need to engage a web developer to make site changes, there will only be one change needed. Then, in the future you can adjust your digital tracking without bugging the web team.
We are going to set up tracking for three key platforms: Google Analytics, Google Ads and Meta.
After following the steps in this article, you will be collecting website data with Google Analytics and feeding the Google and Meta ad networks. This is important because you’ll be able to run ads to site visitors, also known as remarketing, in the future.
Let’s begin!
Secure Your Google Tag Manager Account and Container
Google Tag Manager (GTM) is a free tool that acts as a “master” digital tracker; a container for your tracking tags. It’s what allows you to do a one-time install. You will set up the three platforms within GTM, then install the GTM-provided code to your site.
There are two main benefits of using a tag manager like this. First, it helps balance out page-load speed. Without a tag manager, there is a risk that tracking elements will slow down your site. A tag manager lets the page load first and then triggers all of the tracking.
Second, you can manage and configure any digital tracking through the tag manager itself. This capability allows you to move quickly and push tracking changes to the site without needing a developer.
You first need to secure a Google Tag Manager account and create a container for your website.
1. Make sure you are logged into the proper Google account for your small business. You're going to be creating accounts, and it is important to use the right account connected to your business.
2. Go to TagManager.Google.com; in the upper right you may need to click “Sign In.”
3. In the upper right, click “Create Account.”
4. Give the account the name of your small business. You can also opt to share anonymous data with Google.
5. Scroll down and set up your container.
a. Name the container as your website domain (i.e., the URL for your website).
b. As the target platform, select “Web.”
c. Click “Create.”
6. You will be asked to accept the terms of use. Remember to check the GDPR option (the terms governing compliance with European regulations) in the bottom left of the page.
Congratulations! You have just secured your Google Tag Manager account and created a tag container. Most likely, you’ll see a popup window with the web code you will need later. For now, you can close the popup.
Installing the code will be the last thing you do.
Next, it’s on to setting up Google Analytics so you can get detailed visitor data from your website.
How to set up Google Analytics
Because Analytics is a Google product, configuring the tracking is simple. A lot of the work is already done for you out of the box.
All you need to do is generate your Google Analytics tracking ID, then configure it within GTM.
1. In another browser tab, open Analytics.google.com. In the upper right corner, you may need to click “Sign in.”
2. If you don’t already have a Google Analytics account, you’ll need to create one and continue reading to learn how to set up GA4. If you do have an account, you probably already know that Google officially transitioned from Universal Analytics to Google Analytics 4 earlier this year. Google automatically created a GA4 property for each user based on their Universal Analytics property, so if you plan to keep using your existing analytics account, you can skip to step 11.
3. Give the account the name of your small business. If your business uses the organization distinctions, you can choose to add this to your account. You can also opt to share anonymous data with Google. Scroll down and click “Next.”
4. Create a property for your website. Give the distinct property under your new account a proper name and click “Next.”
![]()
5. Provide your business details and click “Next”.
![]()
6. To speed things up, select the baseline report option and click “Create”.
![]()
7. Read & accept all necessary terms of service agreements.
8. For the data collection section, for your platform, click “Web”.
9. Give the domain for your website data stream and give it a name.
![]()
10. Copy the measurement ID provided by Google. Go back to the browser tab where you have Google Tag Manager open and proceed to step 12.
11. If you already had an analytics account, you can find the measurement ID easily:
a. In the lower left of the page, click “Admin.”
b. In the left menu, select the account that contains the web property you need to track.
c. In the middle column, click “Data Streams” and then the website data stream.
![]()
d. Copy this measurement ID, and go back to the browser tab where you have Google Tag Manager open.
12. In the left menu, click on “Tags.”
![]()
13. Create your first tag. In the upper right of the Tags section, click “New.”
14. In the upper left, rename the tag as “Google Analytics” and click the folder icon; select “Create New Folder.”
15. Create a “Marketing” folder and click “Create.”
16. Now you can start configuring the tag itself. Click anywhere within the “Tag Configuration” section to bring up a list of available tag types.
17. In the menu to the right, select “Google Tag”.
18. Paste in the Measurement ID.
19. Almost done! The last step is to tell GTM when this tracking tag should fire. Because the tag is for Google Analytics, you want it to fire on ALL pages. Click anywhere in the “Triggering” section:

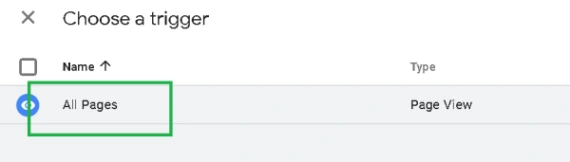
20. Select the “All Pages” trigger; it should be the only one if this is a new GTM account.
![]()
21. In the upper right, click “Save.”
![]()
What did you just do? You learned how to set up Google Analytics! But more specifically, you told GTM that anytime a page is viewed on your website, GTM should go ahead and fire the Google Analytics tracking. Setting the tracking up this way ensures all site visitors are tracked.
You’ll use a similar process to set up the next two tags, Google Ads and Meta.
Secure Your Google Ads Account and Connect Remarketing Pixel
You want to get your Google Ads tracking configured, even if you aren’t running ads yet. That way, whenever you do decide to run some ads, you’ll already have a bunch of website data for remarketing.
All you need to do is find your Google Ads tag, and then configure that within GTM.
1. In another browser tab, open Ads.google.com; in the upper right you may need to click “Sign In.”
2. If you have never created an account, you’ll have to set one up. Follow the instructions to get an account created. Skip ahead to step 3 if you already have an account.
a. You do not have to launch a campaign to finish creating your account. Once the account has been created, you can select “Expert Mode” when it asks you to start a campaign:
![]()
b. Then, when it asks for your campaign goal, in the lower left select “Create an account without a campaign.”
![]()
c. Confirm your billing settings and proceed to your Google Ads account.
3. Once you are in the Google Ads account, in the bottom left menu click on “Tools.” Then, under the Shared Library options, select “Audience Manager.”
![]()
4. In the menu on the top, select “Your Data Sources.”; you need to click the arrow in the right of the menu if you are on a smaller screen.
![]()
5. Find the Google Ads tag section in the list of sources, then click “Set Up Tag.”
![]()
6. Select only the general website data and click “Save and Continue.”
![]()
7. From the tag setup options, select “Google Tag Manager.”
![]()
8. Now you have the Google Ads tracking ID. Copy the Conversion ID provided and go back to Google Tag Manager.
![]()
9. Back in GTM, in the upper right click “New.”
![]()
10. Give the new tag a name and place it in the Marketing folder.
![]()
11. Click anywhere inside the Tag Configuration area. In the right menu that appears, select “Google Ads Remarketing.”
![]()
12. Paste in the Conversion ID provided by Google Ads.
![]()
13. Click anywhere in the “Triggering” section.
![]()
14. Select the “All Pages” trigger.
15. Your tag is now configured. In the upper right, click “Save.”
![]()
What did you just do? Similar to Analytics, you told GTM to fire the Google Ads Remarketing tracking on every page of your website.
Setting up Meta is very similar. Keep pushing through; you are almost done!
Secure Your Meta (formerly Facebook) Pixel and Connect
Lastly, you want to install the Meta pixel for the same reason you installed the Google Ads tracking. Start collecting site data now. Then when you want to run ads later, you’ll already have the website data you’ll need.
All you need to do is find your Meta pixel and configure it within GTM.
1. In another browser tab, open business.facebook.com; in the upper right you may need to click “Log In” and log in to your account.
2. If you have never created a Meta Business account, you’ll have to set one up. Use the following steps to create an account. Skip ahead to step 3 if you already have an account.
a. Select “Create Your Business Manager Account,” enter your small business’ information, and click “Next.”
![]()
b. Fill in your business details and make sure to select your own goods or services, then click “Next.”
![]()
c. Later, you’ll want to claim any existing pages or ad accounts. For now, you only need a Business Manager account to generate a pixel.
3. In the left menu, hover over the All Tools option and go to the “Events Manager” section.
![]()
4. In the upper left, double-check you are in the proper Business Manager account. Switch to the proper account if needed.
![]()
5. In the left menu, click “Data Sources.”
![]()
6. If there is an existing dataset/pixel, skip ahead to step 11.
7. If you need to create a new dataset/pixel, in the left menu click ‘Connect Data Sources”
![]()
8. Select the Web option and in the bottom right click “Connect”.
![]()
9. Give your new dataset/pixela clear name, and click “Create.”
![]()
10. When the dataset has been created, you can click the ‘X’ in the upper right of the ‘Add your website’ popup.
![]()
11. In the upper right menu click ‘Settings” to display the Dataset ID; this is the same as the pixel id.
![]()
12. You’ve now uncovered the Meta dataset ID. Keep this browser tab open and go back to GTM.
13. Back in GTM, in the left menu click Templates.
![]()
14. In the upper right of the ‘Tag Templates’ section, click “Search Gallery”.
![]()
15. In the upper right, search for “facebook” and select the official “Facebook Pixel” template released by the official facebookarchive.
![]()
16. In the upper right, click ‘Add to workspace’
![]()
17. Confirm that you want to add this community template to your GTM in the lower right by clicking ‘Add’.
![]()
Once the template has been successfully added, you will see it listed in the Tag Templates area.
![]()
18. In the left menu of GTM, click Tags.
![]()
19. Back in GTM, in the upper right click “New.”
![]()
20. Give this new tag a name and put in the Marketing folder.
![]()
21. Click anywhere inside the “Tag Configuration” area, and in the right menu that appears, scroll down a bit and select the “Facebook Pixel” template that was just installed.
![]()
22. Go back to the browser tab that has Meta open, showing your dataset ID.
23. Click the dataset ID to copy it to your clipboard.
24. With this ID in your clipboard, go back to the browser tab with Google Tag Manager.
25. Click into the “Facebook Pixel ID(s)” field and paste in the dataset ID.
![]()
26. Click anywhere in the “Triggering” section.
![]()
27. Select the “All Pages” trigger.
![]()
28. Now your tag is configured. In the upper right, click “Save.”
![]()
What did you just do? You told GTM to fire the Meta tracking on every page of your website.
Quick Win: Add “Google Conversion Linker” tag!
Because you are using two Google products (Analytics & Ads), there is a special Google-only tag that will ensure everything is talking to each other properly.
1. In the upper right of the tag list, you’ll see a notification. Click “Add Tag.”
![]()
2. Give this new tag a name and put in the Marketing folder.
![]()
3. In the upper right, click “Save.” There is nothing to configure here. Again, this is a Google-only thing, so it comes preconfigured.
Install GTM Code to Your Website
Now you are ready to publish your tag container for your tracking to go live on your website.
1. In the upper right of Google Tag Manager, click “Submit.”
![]()
2. Give this container version a name and leave a short description. This is useful if you need to roll back to previous tag settings (bug fix, etc.). In the upper right, click “Submit.”
![]()
3. Publishing should only take a few moments. When it’s complete, you’ll be taken to a confirmation screen. In the upper left menu, click on “Workspace.”
![]()
4. In the upper right of the Workspace, click on your GTM ID to display your install code.

5. Keep this install code open and open a new browser window.
![]()
At this point, the remaining task is to install these two code snippets into the header and body of your website. Every website is built on different technology, so if you need assistance, seek out your web person. You’ve done all the hard work, now it’s time for one simple code update.
The first bit of code needs to go in the part of the site and the second snippet needs to go in the of the site. Ideally, both bits of code will be placed close to the top of the and , respectively. This should happen on every page of the site.
Bonus: How to Install Google Tag Manager Code on a WordPress website
WordPress is one of the most popular website platforms; an estimated 400 million sites are built on it.
If your site is built on WordPress, you can install the Google Tag Manager code on it using one simple plug-in. This free plug-in gives you a direct place to put and code, which is exactly what you need for Google Tag Manager.
1. Keep Google Tag Manager open. In a new browser window, log into the administration section of your WordPress website.
2. In the left menu, hover over “Plugins” and click “Add New.”
![]()
3. In the upper right, search for the “Insert Headers and Footers” section. If you don’t see it, use the search at the top right of the page to find it. Once you find it, click the “Install Now” button in that section.
If you are unable to perform these actions, you will need to get an admin to help you install the plug-in.
![]()
4. When the install is complete, click “Activate.”
![]()
5. After the plug-in has activated, you’ll be taken to the master list of plug-ins. In the left menu under “Settings,” click “Insert Headers and Footers.”
![]()
6. Now, you’ll see a place to put code and code.
![]()
7. Go to the browser tab with Google Tag Manager.
8. Next go to the top piece of code, click the copy symbol to copy the code to your clipboard.
![]()
9. Go to the browser tab with the WordPress plug-in and paste in the head code.
![]()
10. Go to the browser tab with Google Tag Manager and, next to the bottom piece of code, click the copy symbol to copy the code to your clipboard.
![]()
11. Go to the browser tab with the WordPress plug-in and paste in the body code.
![]()
12. Scroll down and click “Save Changes.”
![]()
Congratulations! You now know exactly how to set up Google Analytics 4, Google Ads and the Meta Pixel. After completing these steps, your WordPress site will be equipped with professional digital tracking, and you’ll have the power of data at your fingertips to guide your small business’ decisions.
In a future post, we’ll explore how you can use the data you’re gathering.
Side Note: Using the official Google Site Kit plugin for Wordpress
Google has an official plugin for Wordpress called Site Kit that supports Tag Manager directly if you prefer. However, configuring Site Kit requires you to verify site ownership via Search Console which is beyond the scope of this tutorial as it involves your website’s DNS settings.
By default, Site Kit recommends you connect Google Analytics directly. However, since Google Analytics is already being handled by Tag Manager, you do not want to do this. Otherwise your analytics will be doubled because both Site Kit and Tag Manager will be sending over data.
If you do want to use Site Kit, you only need to connect the plugin to Google Tag Manager.